
Over the years I’ve gotten a ton of questions on how I edit my photos for Instagram and in truth the way I edit has changed a lot over time. I used to not really edit my photos at all or only use the in-app filters on Instagram. But, in getting to know so many creatives; bloggers, photographers and Instagrammers & just spending a lot of time with trial and error, I’ve worked to create my own photo aesthetic. I also realized I hated spending time on the computer with Photoshop & Lightroom. I like to be on the move so I found always relying on my laptop for editing was really holding me back from sharing in-the-moment content. So I do all my photo editing on my iPhone.

First off is of course choosing the photo. All of theses photos were taken on my iPhone 7 Plus snapped by my blogger bestie, Noelle Downing. If you guys are curious my process for taking great photos on my iPhone, see my video {ENGLISH / FRANCAIS} When I’m deciding on a photo to post, I go through the photos and ‘heart’ the photos I like and then they are automatically added to the ‘favorites’ folder. Then I got to the ‘favorites’ photo to review the selected ones and decide which is my absolute favorite AKA ✨insta-worthy✨

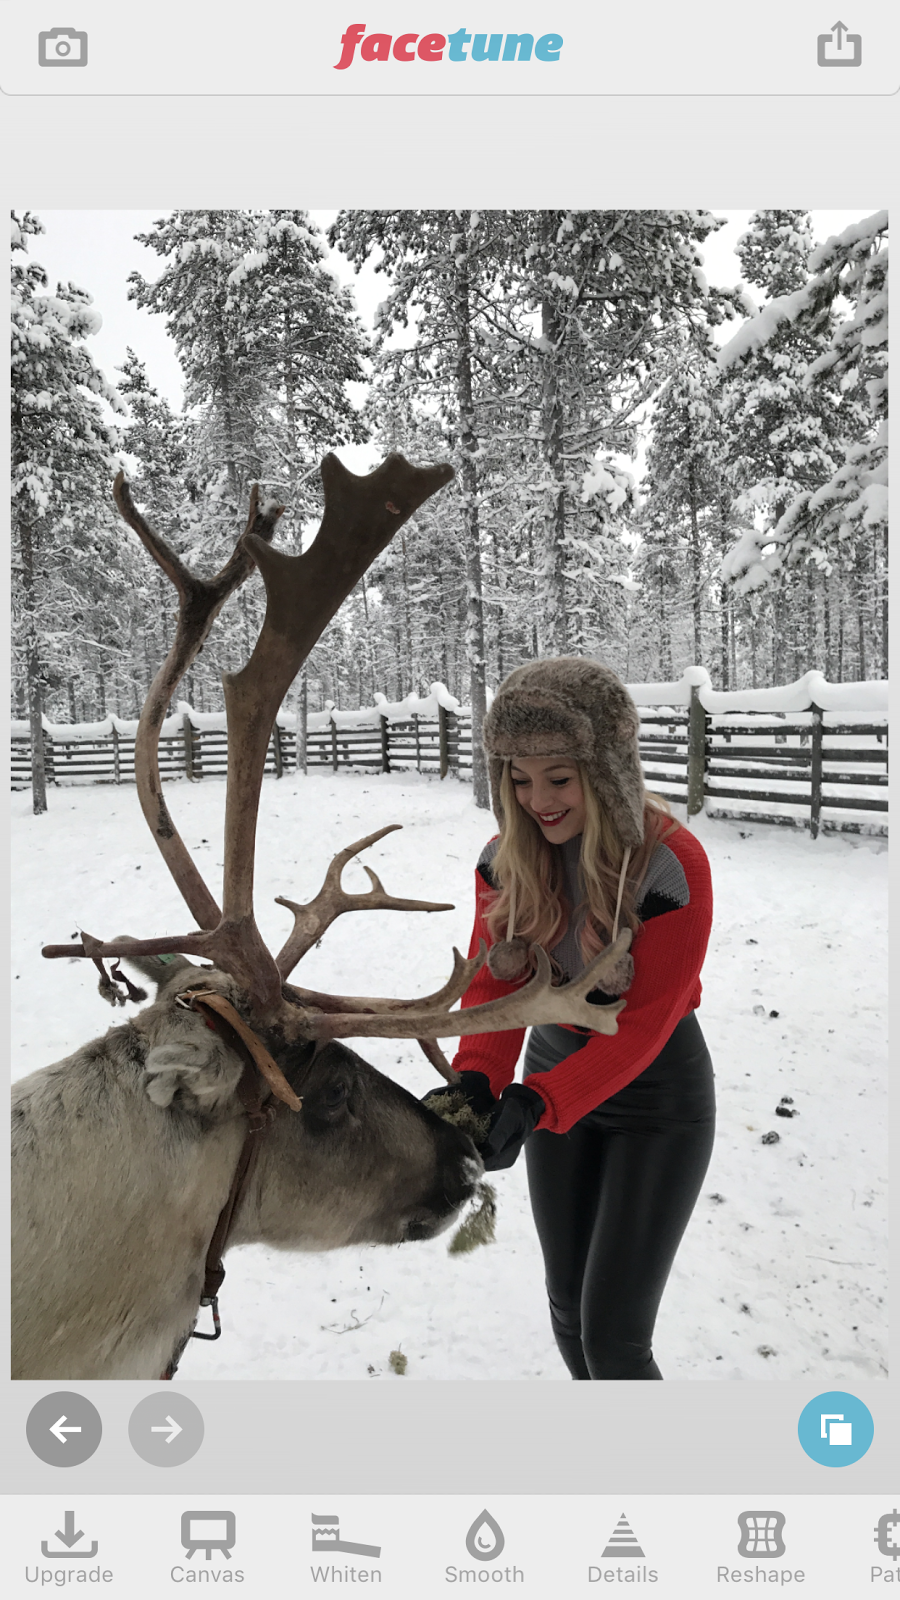
Here’s the photo I chose. I like the composition and colors with my new bestie, Prancer. Or was it Dancer?

The first app I use is Facetune (note this is not the Facetune 2 app – which has some super expensive add-ons) The original FaceTune is $4 but with no in-app purchases to my knowledge.
Here is my photo opened up in the Facetune application.

The first tool I used on this photo in the Facetune app is the ‘Patch‘ tool. This tool is basically a clone stamp that allows you to chose a spot on the photo to copy to another area of the photo.
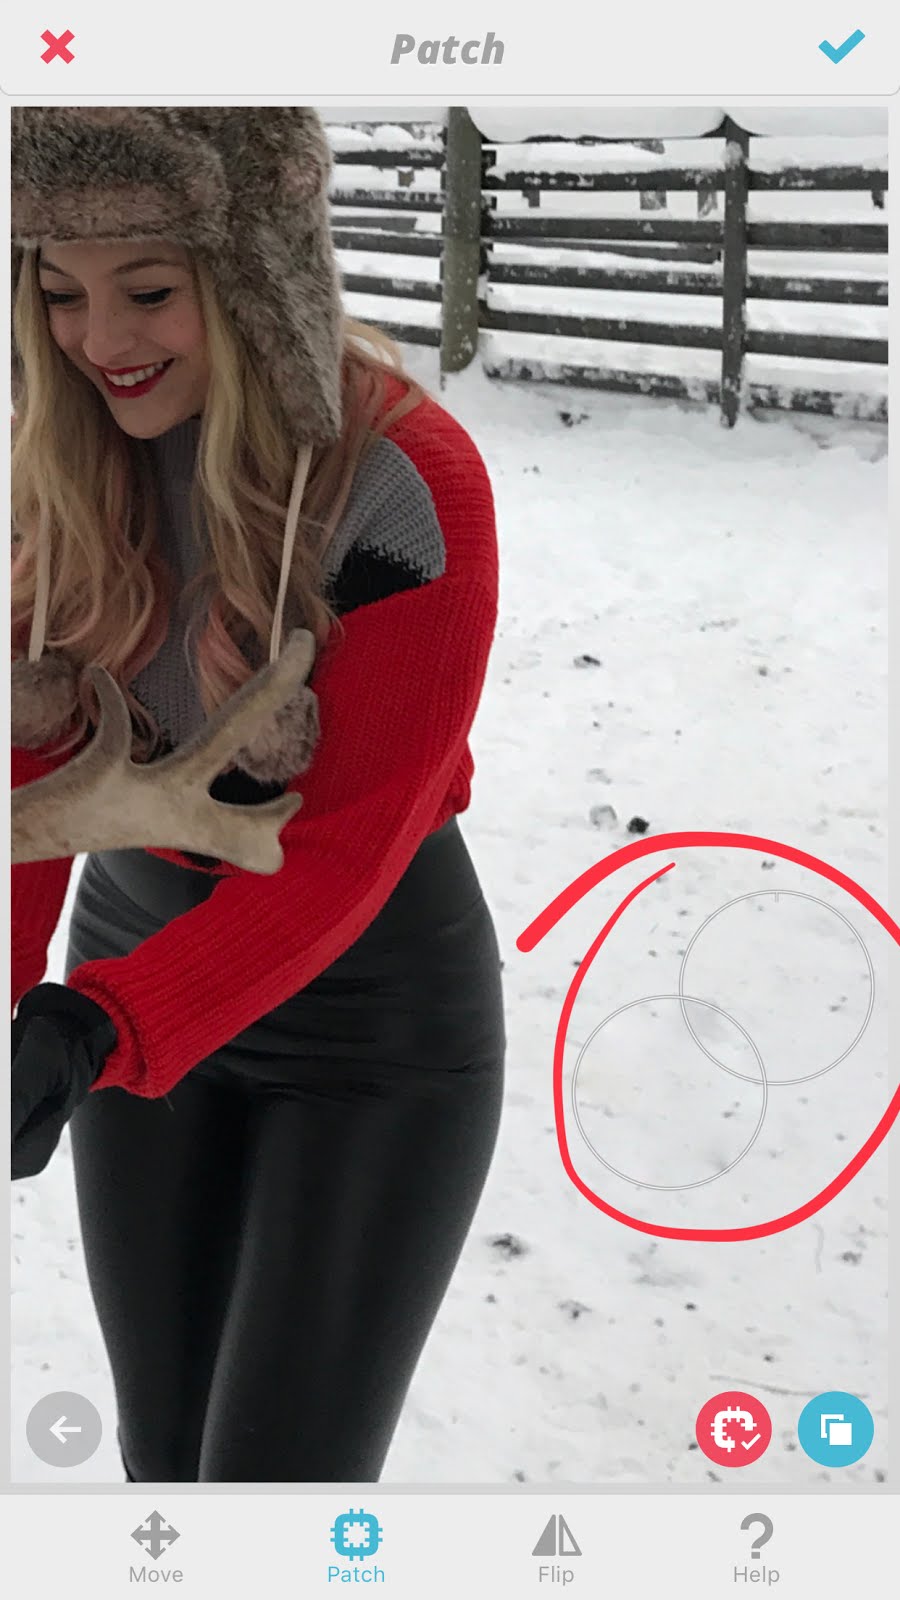
I first zoom into the area where I want to ‘erase’. In this photo there’s a lot of moss (the reindeer’s snacks) and reindeer poop. Because I want the snow to look fresh and keep the focus on myself and the reindeer, I’m going to ‘stamp out’ the dark spots on the photo. When you click the Patch tool two circles will appear, one with a small line in the circle and one without. The circle with the line is the original area and the one without is the cloned area. It’s kind of difficult to explain but once you get the hang of it this process will become second nature. I very often patch out trash and cigarettes from the New York City streets and I’ve even taken an entire person out of a photo. You can also use the Patch tool on pimples which has a much more natural effect than using the ‘smooth’ tool which can give a plastic, doll-like effect. Gotta love the patch tool!

Here’s the before and after to show some of the spots I ‘erased’ with the Patch tool.

Next I use the Details tool to detail my eyes and lips. This helps my draw focus to my face in the photo. I also use the detail tool to detail any other parts of the photo I want to stand out.

Once I’m satisfied I’ll click the upper right corner icon to export the photo & save the photo to camera roll.
The next app I use is definitely my favorite and it’s FREE! It’s called Snapseed and it’s an application from Google.

Click anywhere to open the photo and be sure to add the photo you edited with Facetune (it should appear as the most recent photo on your Camera Roll.
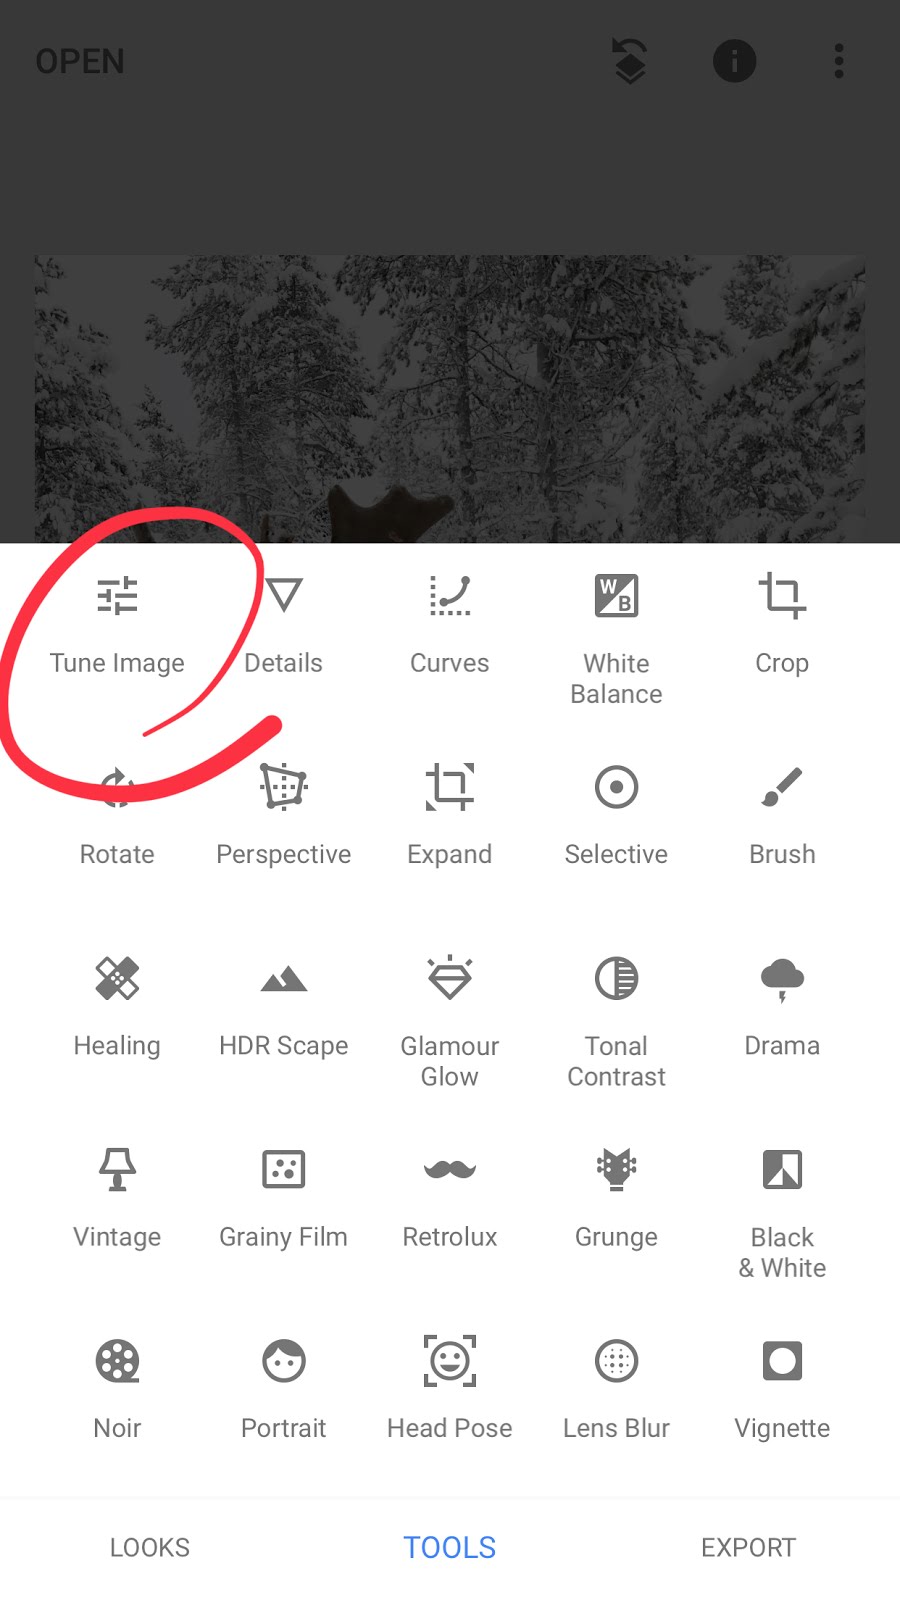
First I open the ‘Tools’ panel and click on the Tune Image tool.

Now this gets a little tricky. This app has a ton of features but it’s not always super intuitive. In the ‘Tune Image’ tool, swipe up and down to see the ‘Tune image‘ menu which includes, “brightness, contract, saturation, ambiance, highlights, shadows & warmth.” These tools will apply to the entire photo. In this picture, I first I bring up the brightness A LOT. Because of the lower light in Finland & my love of a bright, light photos I bring up the brightness +74. You can already see such a big difference. 
The next tool I use is probably my favorite tool in Snapseed and it’s the Selective tool. What I love about this tool is that you can change specific parts of the photo without changing the entire photo. It’s a bit hard to to get accustomed to, however.

To select a specific part of the photo, tap on the area and a circle with a ‘B’ will show up. The “B” stands for brightness and you can change the function by sliding up or down to get brightness, contrast, saturation or structure. Once you have the circle on the area you’d like to edit use your fingers to zoom in or zoom out and the area that is selected will appear red. Once you have the area you want to change you can slide right or left to bring up or down (in this case brightness). I usually brighten my face slightly, again to draw the viewer’s eye to me. It’s great to use the selective tool so I can lighten just my face without over-brightening the entire photo. I sometimes use the ‘saturation’ tool here as well to make my skin slightly more tan or sometimes I bring the saturation down if there’s a yellow tint which often happens with indoor lighting.

The last tool I usually use in Snapseed is the ‘Details’ tool. Because people generally swipe through their Instagram feeds pretty quickly, I like to make sure my photo is sharp so it pops on the screen.

Within the Details tool there are two functions, Structure and Sharpen. The Structure adds more clarity to the photos with contrasting highlights and shadows while Sharpen makes the photo more crisp and clear. I usually add between 10-20 on both Structure & Sharpen.

At this point I’m finished with Snapeed so I click the ‘Export‘ button on the bottom right corner.
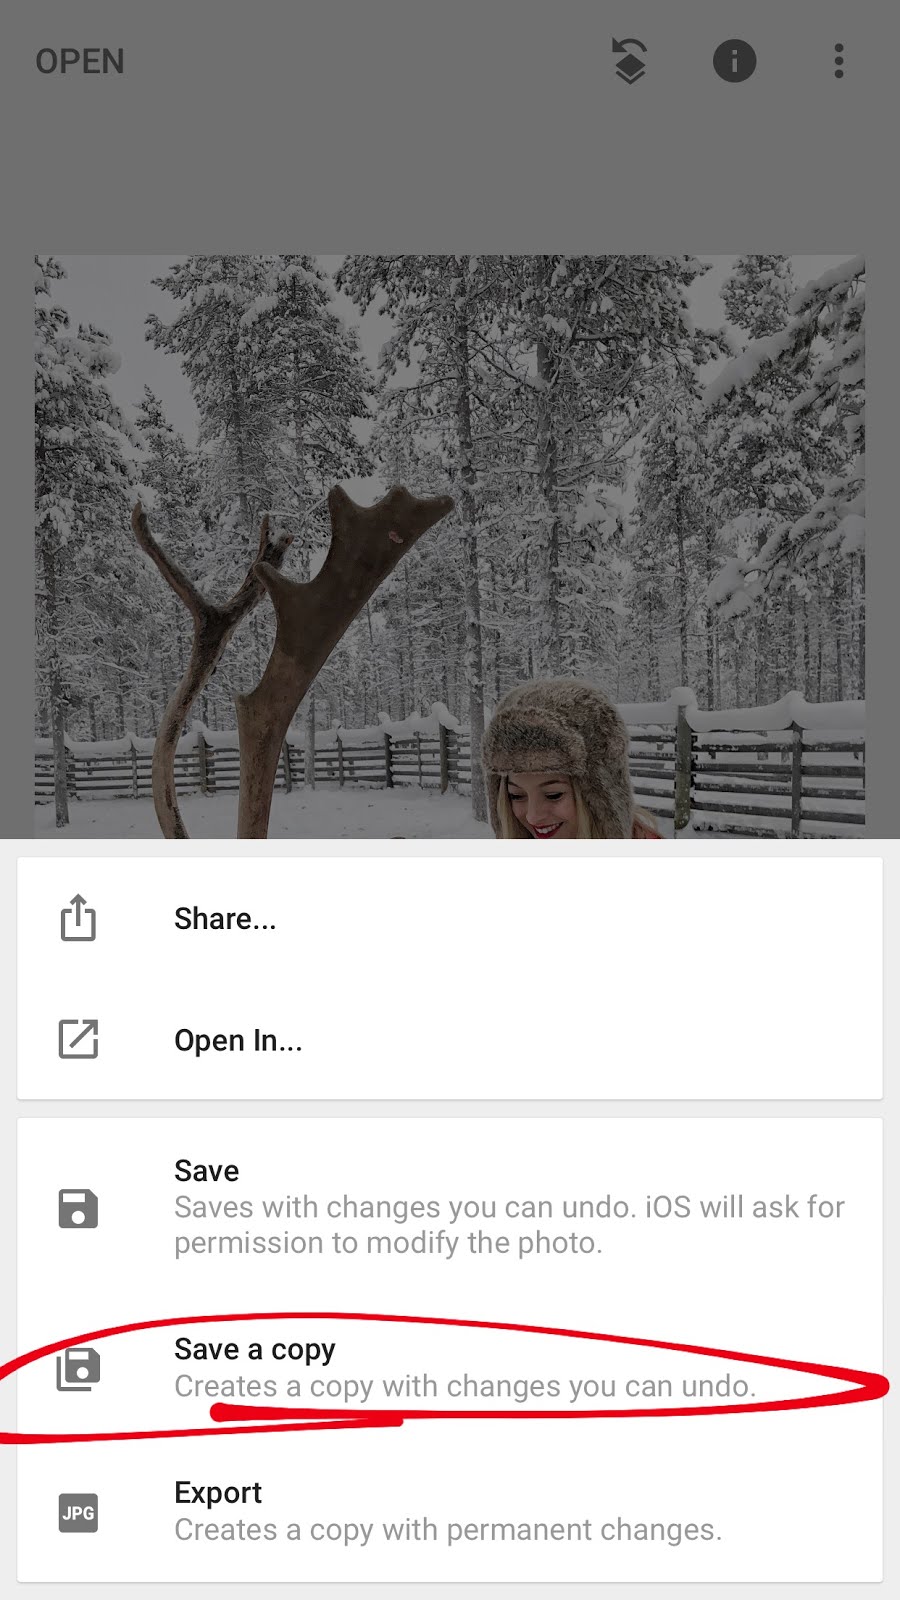
I prefer to “Save a Copy” instead of “Save” because that way it saves a copy of the photo instead of writing over the original photo. But, if you’re looking to save space, ‘Save’ might be a better option.

The last app I use is always VSCO. In my opinion, VSCO has the best filters. It’s a free app but most of the best filter collections are available as in-app purchases.
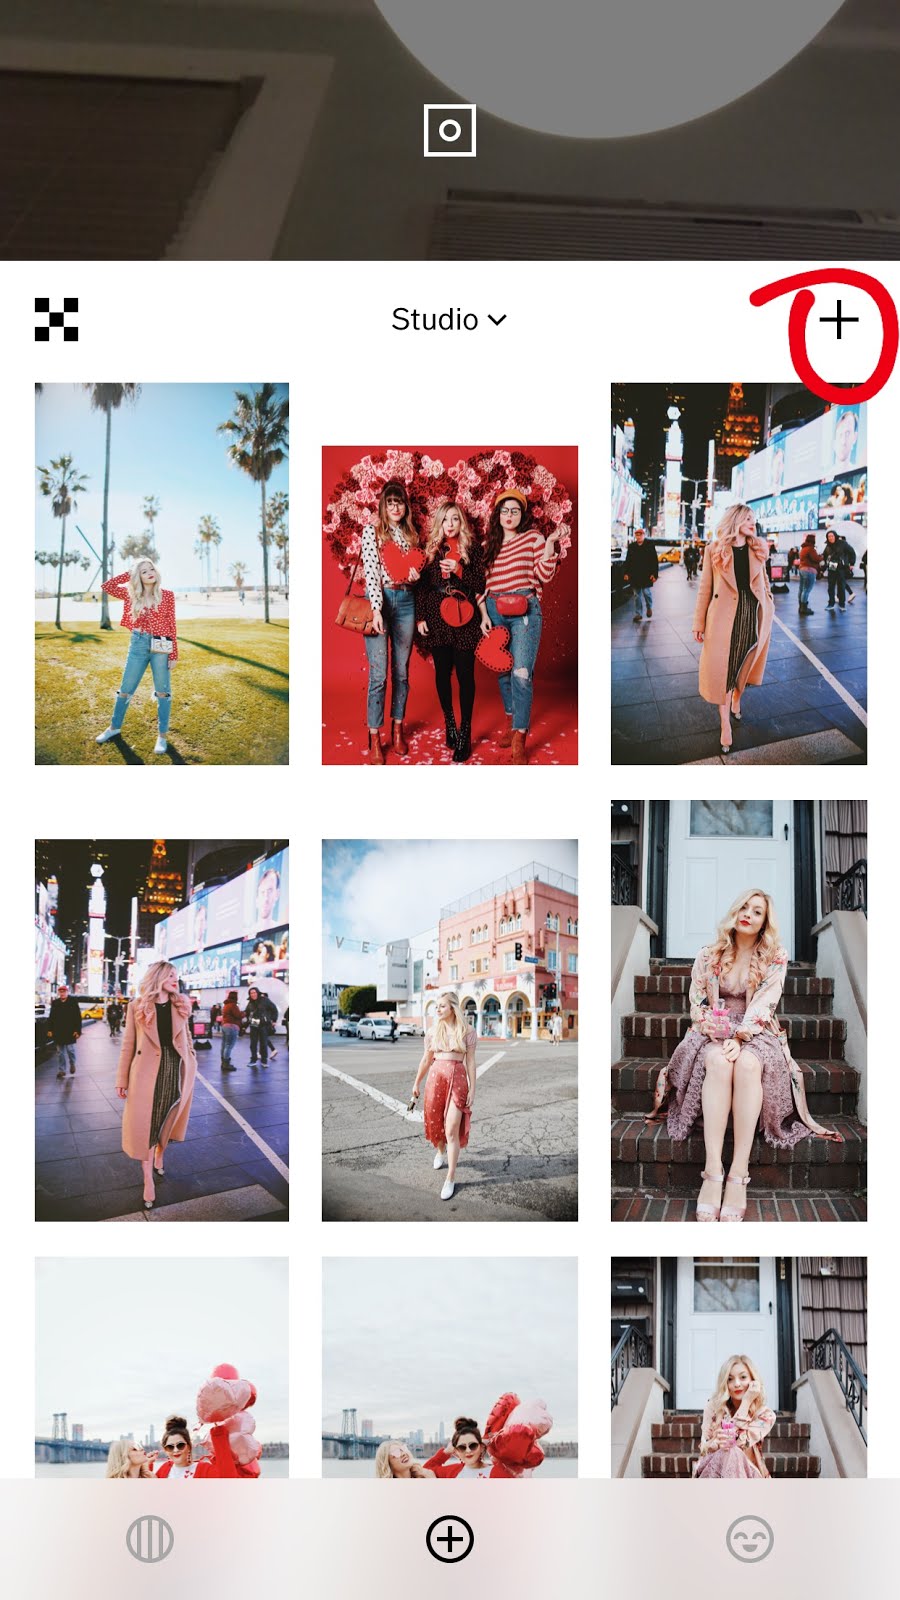
To add a new photo to edit click the plus sign in the upper right corner in the ‘Studio.’

Once your photo is exported, make sure it’s selected (you’ll know because it has a green border as seen above), then click the icon second from the left that’s two lines with circles (kind of like a slider on a mixing console.)
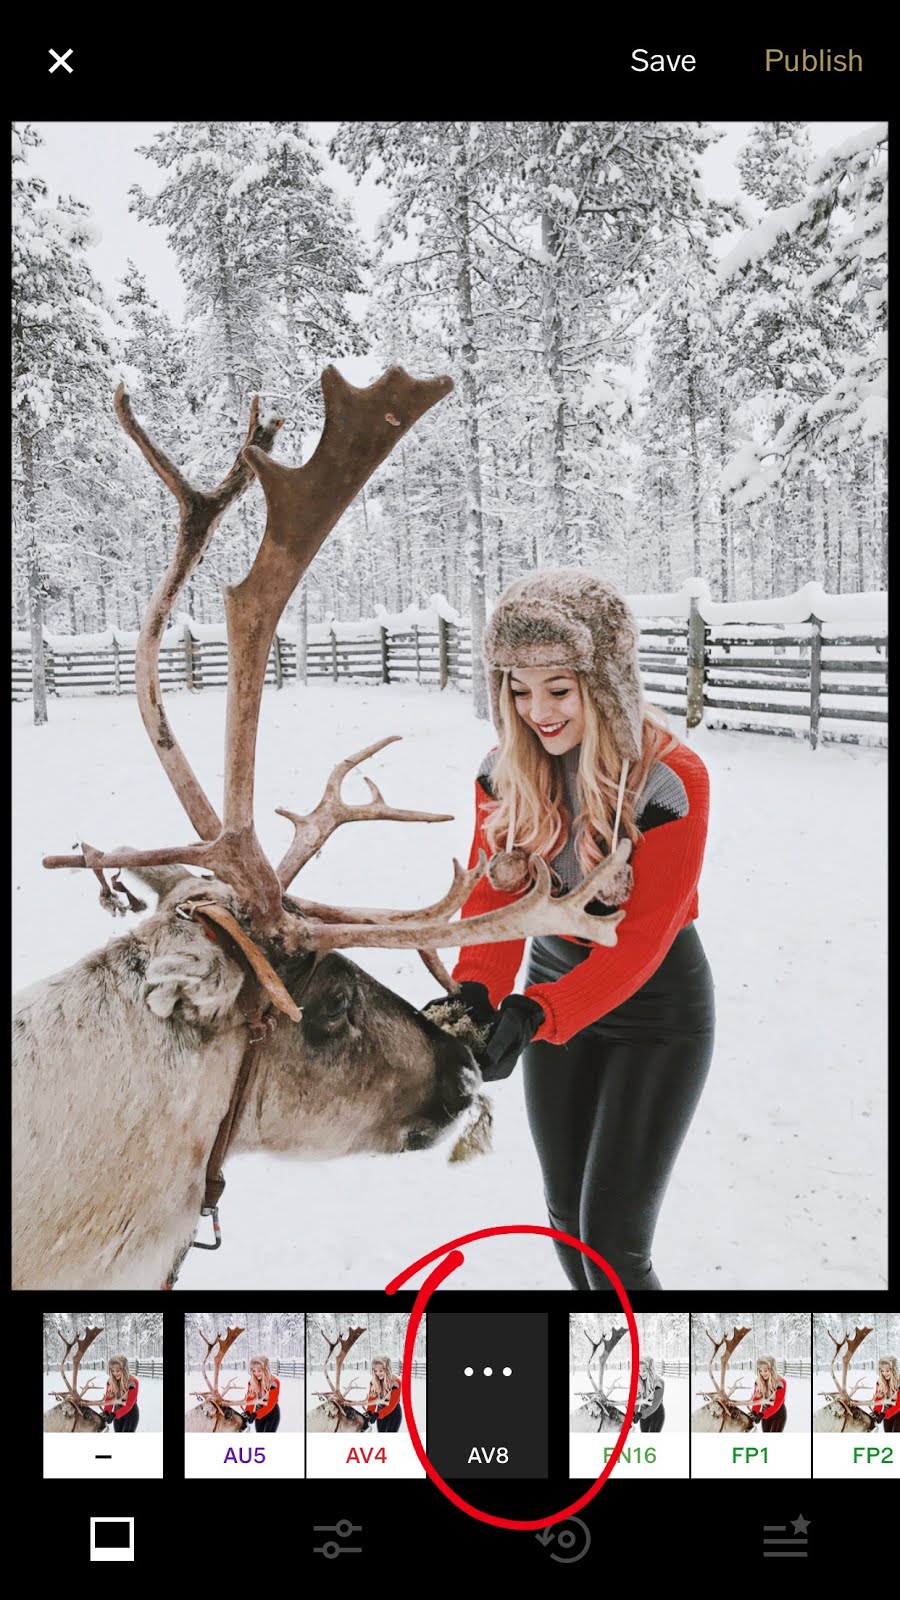

You can only add one filter at a time in VSCO but there’s a loophole, you can stack the filters. I’ll show you how. So for the first filter I wanted something cooler that plays off the icy, snowy vibes of the photo. I use this filter, AV8 most often in the winter. With VSCO filters the key is finding the right amount to add. The slider goes from 0 to 12. I slowly slide my finger across to see what looks best and adds a special something to the photo but doesn’t look too “fake.”

I then save the photo by clicking ‘Save‘ in the upper right corner.

This will bring you back to the ‘Studio.’ To save to your phone click the three dots in the bottom right corner.

Then click ‘Save to Camera Roll’ and be sure to ‘Save as Actual Size’

Then follow the same steps from the beginning by adding the new photo (with the first filter added) into the studio, then click the ‘Slider’ icon.


From you can add a second filter. I add the C7 filter from the Chromatic collection. This collection includes my three most used filters, C7, C8 & C9. This collection is described as warm and retro and personally I love the effect these filters add to my photos. Using filters from the same collections can help keep your overall IG feed looking consistent and cohesive. Because I don’t want this photo to be too warm since we’re in the arctic I only add +3.8 of the C7 filter. I love the warmth it adds to my red sweater and skin.

Et Voila our final photo! See below for the before and after!


If you liked this tutorial go give this photo some love on Instagram – like & comment with your favorite tip from this blog post.